Thursday, 19 September 2019

How to Remove Autofill on Mac with One Click


What Does Autofill Mean

If you’ve never used autofill before let’s take a minute to go over just what it means. When you fill in a form it takes a lot of time, right? You have to fill in things like your name, address, phone number, email address and possibly more. Every time you want to purchase something from a company you have to fill in that information and that can get a little annoying, right? But you don’t have to with a Mac.

Your Mac actually has the ability to save the information that you put in. That means you only have to put the information in a single time. Then, the next time that you go to put your information into a form, the computer itself will actually fill in that information for you. It saves you a whole lot of time and effort, but there are some downsides to this as well. Let’s discover more in next part.

Conclusion

Autofill on Mac automatically fill out these information: online forms including address, credit card, password, etc, and log-in information including email address, password.
Why You Should Delete Autofill on Mac

Now, when you’ve heard about how much more convenient and time-saving it can be to use autofill why would you want to delete it? Well, the number one reason that you should learn how to remove autofill on Mac as quickly as possible is that it’s actually dangerous. When you have autofill you don’t have to fill in any information anymore. Your computer recognizes what your address is, what your date of birth is, even what your credit card number is. That means anyone with access to your computer has access to that information.

Now, it’s very difficult for someone to actually copy the information from your autofill and use it elsewhere. But it’s extremely easy for them to access your computer and use it to do whatever they want. They can use your computer to make a purchase (or several purchase). They can use it to apply for credit cards or loans. They can do anything that they want with that information and you’ll then have to deal with the ramifications that come around as a result. And you may not even realize what they’ve done for months or longer. Or you may not recognize the full extent of the damage until much later.

If that’s what you’re risking, however, what should you do to make sure you don’t have to worry? You should be removing your information from autofill, and that’s going to be a lot easier than you thought.
How Do I Delete Autofill on Mac in Every Browser Manually

Let’s take a look at the three most popular browsers and how to remove autofill on Mac manually. We’ll talk you through the process so if this is what you want to do, you can absolutely jump in and take care of your information.
Remove AutoFill in Safari

Safari is one of relatively popular browsers and we’ll take a look at the process here. It’s actually a little more in depth to get it done. A distant 10.54% of people choose Safari as their favorite browser. That puts this browser as the third out of the top three web browsers, only slightly ahead of Internet Explorer, which is the fourth most popular.


Open the Safari browser.


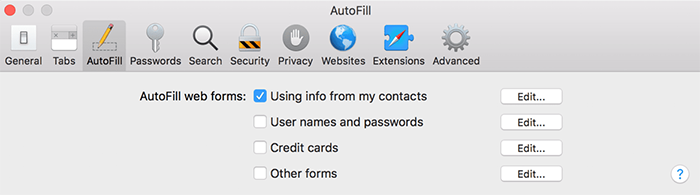
Select “Preferences” then “Autofill”.


Select “User Names and Passwords” and select ‘Edit’ then “Remove”.


Select “Credit Cards” and select “Edit” then “Remove”.


Select “Other Forms” and select “Edit” then “Remove”.


Tip: To turn off autofill in Safari on Mac, just turn to "Disable Autofill in Safari" part.
Remove AutoFill in Chrome

Chromeis one of the most popular browsers around and as a result you may need to know how to remove your autofill information from Chrome. Below are the simple steps to do that.


Open the Chrome browser.


Select “History” then “Full History”.


Select “Clear Browsing Data”.


Select “Passwords” and “Autofill Form Data”.


Select “Clear Browsing Data” again to confirm.


Tip: To turn off autofill in Chrome on Mac, just turn to "Disable Autofill in Chrome" part.
Remove AutoFill in Firefox

This is another of the most popular browsers out there thought and the process to remove autofill is actually relatively simple.


Open the Firefox browser.


Click “History” > “Show All History”.


Select “Everything” in the “Time Range to Clear” menu.


Choose “Form & Search History”.


Click “Clear Now”.


Tip: To turn off autofill in Firefox on Mac, just turn to "Disable Autofill in Firefox" part.

Now, if you’re looking at how to remove autofill on Mac this way you’re going to spend a lot of time at it. Going through each browser, one at a time, and deleting all of your information is going to require a little bit of a learning curve too. After all, you have a different process for each of the most popular browsers. But what if you could do it more easily? What if there was a type of Mac cleaning software that could scrub your information from every browser with just the click of a button? You’re in luck, because it absolutely exists. You just need to take a look at the app we are going to talk about next.

Also Read:deepnude alternatives

Also Read:4K Video Downloader


Thursday, 21 March 2019

If I Sign Out of iCloud on My iPhone Will I Lose Everything?

If I Sign Out of iCloud on My iPhone Will I Lose Everything?

The answer to the above question will be stated in the following parts of this post, and we shall discuss how to sign out of iCloud without losing data.

If I Sign Out of iCloud on My iPhone Will I Lose Everything?

No, signing out of iCloud account doesn’t remove all your iOS files. You can get to keep some of your data on the device such as contacts, notes, iCloud Photo Library, etc. Note that at the point of signing out of iCloud, Apple will offer you the choice between:


Deleting the data in your mobile device.


Keeping the data in your mobile device.

Your choice will not affect the data stored on the iCloud server but can affect the data in your iOS device. Furthermore, Apple services like iCloud Mail or iCloud Drive won’t be available to you.

Therefore, signing out of iCloud deregisters your iOS device from Apple servers, and halts the synchronization of data between your iOS device and Apple servers. More so, all the data stored in iCloud will remain intact, and iCloud would continue to sync data on other devices that share that same iCloud account.
How to Sign Out of iCloud without Losing Data

From the above answer, you’ve seen that it’s possible to sign out of iCloud without losing your personal data and information. Here are the steps to accomplish it:

Step 1. Go to iPhone’s Home screen and launch the Settings app.

Step 2. Click [Your Name] on top of the page.

Step 3. Scroll down to find the option “Sign Out” and click it.


Step 4. Before signing out of the iCloud account on your iPhone, if you’ve activated Find My iPhone, the first pop up will request that enter your Apple ID password to turn it off.

Step 5. Enter your Apple ID password and then click on “Turn Off”.

Step 6. Turn on the switch of the data you would like to keep on your device.

Step 7. Double click ‘Sign Out” to confirm your request.
How to Sign Out of iCloud Account without Knowing the Apple ID PasswordTips: Restoring Lost Photos and Videos from iPhone

If you have deleted some of your pictures or videos from your gallery, then there is a straightforward way to Recover Deleted Files iPhone back.

After you delete the media files from your gallery, be it photos or videos, then you must know that IOS has a feature that the deleted media files doesn’t get deleted immediately, but it gets compiled to a temporary folder from where it gets deleted after 30 days. If you lost data after you updated to a new iPhone, you can always use Gihosoft iPhone Data Recovery to get the data back from the old iPhone or backup. Should you wish to recover these files, you must go to that “recently deleted” folder and retrieve these files before 30 days.

If you use android phones, please choose Gihosoft Android Data Recovery.


Monday, 25 February 2019

Enable Text Message Forwarding on iOS 12/11?


Steps to Enable Text Message Forwarding on iOS 12

Here is how to enable text message forwarding on iOS 12

(1) On your iPhone running iOS 12 or earlier versions, go to Settings > Messages > Send & Receive.

(2) Tap where it says "Use your Apple ID for iMessage" and then put in your Apple ID and password.

(3) Now you can choose an e-mail address to associate with your Apple ID. After you have chosen the one that you want to use, click Next.

(4) Go to Settings > Messages again, then tap Text Message Forwarding.

(5) Your iPad or Mac will receive a verification code in Messages. You will need to enter this code into your iPhone to verify.


Can't Activate iMessage & No Text Message Forwarding Option?

If you can't seem to activate iMessage, then try a few things:


Check the time and data on your iPhone.


Turn off and restart iMessage.


Update your version of iOS.


Talk to your cellular service provider.


Toggle airplane mode on and off.


Remove any restrictions for iMessage in your settings.


Sign out of iMessage and sign back in.

You can read about these troubleshooting methods in more detail here: How to Fix Error Occurred during iMessage Activation?

Sponsor ads:Avoid Toll Roads in Apple Maps and Google Maps

Sponsor ads:Best Barcode and QR-Code Scanner Apps for iPhone in 2019


TIP: Transfer Old iPhone Messages to Your iPhone X/8
Sponsor ads:Windows 10 Go Back to An Earlier Build Missing after 10 Days


Sponsor ads:Top 7 Websites to Stream Your Favorite Christmas Movies in 2018

Restore iPad without iCloud Password


2. How to Restore iPad without Password using iTunes


Use this method only if you previously synced your iPad with iTunes. So make sure it is the right step for you before continuing.


If you have earlier synced your device with iTunes, you can quickly restore it.


Step 1: Connect your iPad to the computer with which it is synchronized.


Step 2: Open iTunes. If you are asked to enter a password, try another computer that you have synced your device with.


Step 3: Click on the device tab and tap Restore iPad.


Step 4: From the confirming box, tap Restore.


Step 5: From the iPad Software Update box, click Next.


Step 6: Then click Agree to accept the license terms and continue.


Wait patiently for iTunes downloading iOS and restoring your iPad.
3. How to Restore iPad without Passcode in Settings


This way only works when you have done an iCloud backup before. The Find My iPad should be disabled as well.


Step 1: Go to Settings > General > Reset > Erase All Content and Settings.


Step 2: When your iPad restarts, you’ll see the Hello screen and need to set up your iPad.


Step 3: When you are in the Set up page, tap Restore from iCloud Backup.


Step 4: Then choose the specific backup and wait for it to finish.


Sponsor ads:
Transfer Music from Android to Android
You may also like:Sponsor ads:Download Game of Thrones Season 7 Episode 4 Subtitles?
Must Read:If you lost data after you updated to a new iPhone, you can always use Gihosoft iPhone Data Recovery to get the data back from the old iPhone or backup.


Gihosoft Free iPhone Data Recovery:iphonerecovery.com


If you use android phones, please choose Gihosoft Android Data Recovery
Sponsor ads:10 Best Two Player Games for iPhone and iPad to play Challenges with Your Friends

Thursday, 21 February 2019

How to Transfer Gopro to iPad/iPhone 2019


2: Wirelessly Transfer GoPro Files to iPad/iPhone

You can also transfer your GoPro files wirelessly to your iDevice. You can follow the steps mentioned below to do so.

Step 1: Download the GoPro App in your iPhone and tap “Connect your Camera” in the app -> tap “Add New Device -> tap the model of your GoPro device.

Step 2: Press the mode button on your GoPro camera and go to Setup and select it.

Step 3: Click “continue” on the app.

Step 4: Press the shutter button twice to connect your GoPro camera to wi-fi and then press the mode button to highlight “Pair”. Select it by pressing the shutter button.

Step 5: Tap “continue” on the app again.

Step 6: Select GoPro App on the camera.

Step 7: Tap “Continue” on the app and enter the PIN appearing on your camera’s screen. Enter your password and tap “Update your Camera”.

Step 8: Tap your camera name. You can then transfer your GoPro files from camera to iPhone.


3: Can iTunes Transfer GoPro Files to iPad/iPhone?

iTunes does not allow you to transfer GoPro files to iPhone. The only way you can do so is by first transferring your GoPro files to your computer, and then syncing your iPhone with iTunes and transferring the files from your PC to iPhone using iTunes.

As such, iTunes is limited in its functionality as it does not allow easy two-way transfer between different devices and iPhone/iPad


4: iPhone Video Format – Free Video Player & Converter Recommend

iPhone supports two video formats which include:

- H.264 video format

- MPEG-4 video format

GoPro camera records your videos in the H.264 and MP4 formats. As such, all GoPro videos may not be playable on your iDevice if they are recorded in MP4 format since it is not supported by iPhone.

You may however download the free VLC iOS app if you want full MP4 support. The app supports all videos played in MP4 formats on iPhone or iPad. Hence, you can play your GoPro videos in MP4 format on iPhone through VLC.Gihosoft Free iPhone Data Recovery:iphonerecovery.com


However, if you wish to convert your GoPro videos so that they are playable on your iPhone, you may then use a video converter. There are many free video converter apps that you can use to convert your videos into supported formats. Like Freemake Video Converter.


Freemake video converter, yet another easy-to-use app,lets you convert your videos into various formats including MP4, MOV, AVI, 3GP, DVD, FLV and WMV.Sponsor ads:

Gihosoft Free iPhone Data Recovery:iphonerecovery.com

Free iPhone Data Recovery Software for Windows/Mac

Recover up to 12+ types of files, including contacts, SMS, photos, WhatsApp, Viber, notes, etc.

Restore lost data from iOS devices directly or from iTunes and iCloud backup

Recover iPhone data lost due to iOS upgrade/jailbreak, accidental deletion, device lost or broken

Support all the latest iPhone, iPad and iPod Touch

Both Free and Pro version.

If you lost data after you updated to a new iPhone, you can always use Gihosoft iPhone Data Recovery to get the data back from the old iPhone or backup.

Top 10 Best FRP Bypass Tools to Bypass Google Account on Android Device 2019

Worth reading:download youtube 1080p

If you use android phones, please choose Gihosoft Android Data Recovery


Jihosoft Android Data Recovery: the best Android Data Recovery software for Windows and Mac to recover deleted contacts, messages, photos, videos, WhatsApp and etc from Android

Wednesday, 20 February 2019

Top 4 iPhone Wipe Tool 2019


2Apowersoft iPhone Wipe Tool

This is a wipe tool capable of cleaning all types of files. In addition, this tool is also capable of cleaning passwords to protect your privacy. iPhone data cleaner comes with 4 data erasing modes designed to clean the different types of data.

Key FeaturesSupports all file formats.

Comes with “Express Clean up” mode that can clean all junks.

Erase data in such a way that they remain unrecoverable.


3Safe Eraser App to Wipe iPhone

This top iPhone wipe tool is good at erasing all kinds of data using 4 different erasing models. It is capable of erasing messages, photos, videos and all junk files to create space on your device.

Key FeaturesErase deleted files.

Have 4 erasing modes.

It is easy to use.


4Coolmuster iOS Eraser

Like other iPhone wipe tools, Coolmuster is capable of erasing different kinds of files in such a way that it cannot be recovered by any means. Before using this tool like any other one, you may wish to create a backup option to secure your important files.

Key FeaturesUser friendly interface.

Comes with different data erasing modes.


5iShredder

This is a unique wiping tool in the sense that it sends all the unwanted data to Nirvana easily. It has a 3 step process of deletion and it is very easy to use. For this reason, it is actually a top iPhone wipe tool to have.

Key FeaturesDestroys data without the option of retrieval.

The tool is advanced.

Different erase modes available.


Sponsor ads:

Gihosoft Free iPhone Data Recovery:https://www.gihosoft.com/iphone-data-recovery-free.html

Gihosoft iPhone Data Recovery Free

Free iPhone Data Recovery Software for Windows/Mac

Recover up to 12+ types of files, including contacts, SMS, photos, WhatsApp, Viber, notes, etc.

Restore lost data from iOS devices directly or from iTunes and iCloud backup

Recover iPhone data lost due to iOS upgrade/jailbreak, accidental deletion, device lost or broken

Support all the latest iPhone, iPad and iPod Touch

Both Free and Pro version.

If you lost data after you updated to a new iPhone, you can always use Gihosoft iPhone Data Recovery to get the data back from the old iPhone or backup.You may also like: iphonerecovery.com

If you use android phones, please choose Gihosoft Android Data Recovery.

With Gihosoft Android Data Recovery, no longer afraid of data loss!

Must read:Youtube video downloader for pc

Gihosoft RePicvid Free Photo Recovery Software provides a free photo recovery software for windows to help users recover the deleted or lost photo for free.

Jihosoft Android Data Recovery: the best Android Data Recovery software for Windows and Mac to recover deleted contacts, messages, photos, videos, WhatsApp and etc from Android devices.Tips:How to transfer messages from iPhone to iPhone

jihosoft Free iPhone Data Recovery

Monday, 18 February 2019

How to Download Calendar from iCloud 2019


It happens, you lose some of the calendar entries on your iPhone or iPad for some reason and you need to get them back. If you regularly backup your calendar on iCloud, all you have to do it restore the device and the entries will be recovered. But restoring your device from an iCloud backup often means that you have to erase all the content and settings on the device which can result in the loss of the data that wasn’t backed up.

But there is a simpler solution. You can simply download the calendar from iCloud or use third-party tool to extract the calendar from your iCloud Backup.
1 How to Download Calendar from iCloud as an iCal file

You can export your calendar to your computer as an iCal file. Follow these simple steps to do it.

Step 1: Go to www.icloud.com on any browser. Sign in and then click on “Calendar.”

Step 2: Click on the signal icon beside the calendar name and then check “Public Calendar.”

Step 3: Copy the web address of the calendar you want to export. It should begin with “webcal” but be sure to replace “webcal” with “http” and then click “Enter.” The calendar should download immediately and it should show up on the downloads history of your internet browser.


Sponsor ads:

Gihosoft Free iPhone Data Recovery:https://www.gihosoft.com/iphone-data-recovery-free.html

Gihosoft iPhone Data Recovery Free

Free iPhone Data Recovery Software for Windows/Mac

Recover up to 12+ types of files, including contacts, SMS, photos, WhatsApp, Viber, notes, etc.

Restore lost data from iOS devices directly or from iTunes and iCloud backup

Recover iPhone data lost due to iOS upgrade/jailbreak, accidental deletion, device lost or broken

Support all the latest iPhone, iPad and iPod Touch

Both Free and Pro version.

If you lost data after you updated to a new iPhone, you can always use Gihosoft iPhone Data Recovery to get the data back from the old iPhone or backup.You may also like: iphonerecovery.com

If you use android phones, please choose Gihosoft Android Data Recovery.

With Gihosoft Android Data Recovery, no longer afraid of data loss!

Must read:Youtube video downloader for pc

Gihosoft RePicvid Free Photo Recovery Software provides a free photo recovery software for windows to help users recover the deleted or lost photo for free.

Jihosoft Android Data Recovery: the best Android Data Recovery software for Windows and Mac to recover deleted contacts, messages, photos, videos, WhatsApp and etc from Android devices.Tips:How to transfer messages from iPhone to iPhone


jihosoft Free iPhone Data Recovery

How to Remove Autofill on Mac with One Click

What Does Autofill Mean If you’ve never used autofill before let’s take a minute to go over just what it means. When you fill in a form it t...